Let's Build An API
Building a user authentication API with full CRUD operations
2.17.22
I’ve written about building APIs with the Django REST Framework before but for this post I want to share how to actually do it. I am going to walk you through how to set up an API for managing user accounts for a Django project. This API allows for an independently developed frontend to register new users, authenticate them with encrypted JSON Web Tokens, grab specific user data, update that user data and then delete the user account. Since its Django, we get access to the built-in admin dashboard for viewing changes made with the API. Since its Django REST Framework, we get the web browsable UI for the API. And since we are building an API, I suggest using a tool like Postman for testing it.
I am going to start from scratch here. Below are some bash/shell commands that I start every new Django project with. I should probably mention that this is for Python 3 and up. Type python -V if you aren’t sure.
$ # create virtual environment
$ virtualenv venv
$ # activate venv
$ . venv/bin/activate  # if on mac/linux
$ # install django
$ python -m pip install django
$ # create django project
$ django-admin startproject <project-name>
$ # change into project
$ cd <project-name>
$ # migrate admin and auth to SQLite db
$ python manage.py migrate
$ # create superuser so you can login to /admin
$ python manage.py createsuperuser
$ # follow prompts
$ # start django server
$ python manage.py runserver
Every Python program should always be written in a virtual environment to keep project’s dependencies isolated from other projects. After the development environment is created and activated, install Django and start a project. That migrate command applies models into the database schema. You use it when you create models and change them. We are using it here to create an SQLite database and applying stock models that Django comes with to it. This allows for access and use of the built-in admin dashboard and the SQLite database will hold the data for the user accounts. After the admin dashboard is created you need to create an admin user to access the dashboard. Django CLI walks you through some basic questions. Now you can finally fire up the development server. In a browser, check out http://127.0.0.1:8000/ or http://localhost:8000/ to see if everything is working so far. You should see a little rocket ship success message.
Time to install the Django REST Framework. Kill the server in the terminal (Control + C on mac) or in a new window:
$ # install django REST framework
$ pip install djangorestframework
$ # DRF docs suggest the next two dependencies
$ # Markdown support for the browsable API.
$ pip install markdown
$ # Filtering support
$ pip install django-filter
Let Django know about the install. In project-name/settings.py, add rest_framework to INSTALLED_APPS.
INSTALLED_APPS = [
    ...
    'rest_framework',
]
Now start a Django app.
$ python manage.py startapp <app-name>
Right under rest_framework in settings.py, add the app.
INSTALLED_APPS = [
    ...
    'rest_framework',
    'app-name',
]
In the root urls.py, add a route that points to the app.
urlpatterns = [
    path('admin/', admin.site.urls),
    path('api/', include('<app-name>.urls')),

]
Next we set up JWT authentication. JWT (apparently pronounced “jot”) is JSON Web Token. JSON is JavaScript Object Notation. Acronym inception. JWT is a “proposed Internet standard”. It is easy to read because it’s JSON, it’s encrypted so it’s pretty safe and it doesn’t use a database so it’s pretty fast. Simple JWT is a popular plugin to use JWT in Django. Install it in the terminal:
$ pip install djangorestframework-simplejwt
In settings.py, add the rest_framework_simplejwt.authentication.JWTAuthentication to the list of authentication classes:
REST_FRAMEWORK = {
    'DEFAULT_AUTHENTICATION_CLASSES': (
        'rest_framework_simplejwt.authentication.JWTAuthentication',
    )
}
Next, create
from rest_framework_simplejwt.views import (
    TokenObtainPairView,
    TokenRefreshView,
)

urlpatterns = [
    ...
    path('api/token/', TokenObtainPairView.as_view(), name='token_obtain_pair'),
    path('api/token/refresh/', TokenRefreshView.as_view(), name='token_refresh'),
    ...
]

# note: can change the url paths to something like
path('users/login/', views.MyTokenObtainPairView.as_view(), name='token_obtain_pair'),
This can get a little tricky because of files with the same name. In the root urls.py, point the app toward the new urls.py.
from django.contrib import admin
from django.urls import path, include

urlpatterns = [
    path('admin/', admin.site.urls),
    path('api/', include('api.urls')),
]
Back in settings.py, you can customize the token:
# https://django-rest-framework-simplejwt.readthedocs.io/en/latest/settings.html
from datetime import timedelta

SIMPLE_JWT = {
    # 'ACCESS_TOKEN_LIFETIME': timedelta(minutes=5),
    'ACCESS_TOKEN_LIFETIME': timedelta(days=30),
    'REFRESH_TOKEN_LIFETIME': timedelta(days=1),
    'ROTATE_REFRESH_TOKENS': False,
    'BLACKLIST_AFTER_ROTATION': True,
    'UPDATE_LAST_LOGIN': False,

    'ALGORITHM': 'HS256',
    # 'SIGNING_KEY': settings.SECRET_KEY, # this was throwing an error
    'VERIFYING_KEY': None,
    'AUDIENCE': None,
    'ISSUER': None,
    'JWK_URL': None,
    'LEEWAY': 0,

    'AUTH_HEADER_TYPES': ('Bearer',),
    'AUTH_HEADER_NAME': 'HTTP_AUTHORIZATION',
    'USER_ID_FIELD': 'id',
    'USER_ID_CLAIM': 'user_id',
    'USER_AUTHENTICATION_RULE': 'rest_framework_simplejwt.authentication.default_user_authentication_rule',

    'AUTH_TOKEN_CLASSES': ('rest_framework_simplejwt.tokens.AccessToken',),
    'TOKEN_TYPE_CLAIM': 'token_type',

    'JTI_CLAIM': 'jti',

    'SLIDING_TOKEN_REFRESH_EXP_CLAIM': 'refresh_exp',
    'SLIDING_TOKEN_LIFETIME': timedelta(minutes=5),
    'SLIDING_TOKEN_REFRESH_LIFETIME': timedelta(days=1),
}
Now add those views that the new urls.py point to in app-name/views.py:
from rest_framework_simplejwt.serializers import TokenObtainPairSerializer
from rest_framework_simplejwt.views import TokenObtainPairView

class MyTokenObtainPairSerializer(TokenObtainPairSerializer):
    @classmethod
    def get_token(cls, user):
        token = super().get_token(user)

        # Add custom claims
        token['name'] = user.name
        # ...

        return token

class MyTokenObtainPairView(TokenObtainPairView):
    serializer_class = MyTokenObtainPairSerializer
Now we need to set up some serializers. Serializers allow complex data such as query-sets and model instances to be converted to native Python datatypes that can then be easily rendered into JSON, XML or other content types. Django comes with a User model already that we can use. We will import that existing User model and the ModelSerializer from Django REST Framework.
Create the file project-name/app-name/serializers.py
from django.contrib.auth.models import  User
from rest_framework import  serializers
from rest_framework_simplejwt.tokens import RefreshToken

class  UserSerializer(serializers.ModelSerializer):
    name = serializers.SerializerMethodField(read_only=True)
    id = serializers.SerializerMethodField(read_only=True)
    isAdmin = serializers.SerializerMethodField(read_only=True)

    class Meta:
        model = User
        fields = ['id', 'username', 'email', 'name', 'isAdmin']

    # you can create serializer method fields that return back custom attributes

    def get_id(self, obj):
        return obj.id

    def get_isAdmin(self, obj):
        return obj.is_staff

    def get_name(self, obj):
        # passing into built in django field first_name
        name = obj.first_name
        if name == '':
            name = obj.email
        return name

# extending off UserSerializer
class UserSerializerWithToken(UserSerializer):
    token = serializers.SerializerMethodField(read_only=True)
    class Meta:
        model = User
        fields = ['id', 'username', 'email', 'name', 'isAdmin', 'token']

    def get_token(self, obj):
        token = RefreshToken.for_user(obj)
        return str(token.access_token)

    # take that user object and return back another token with the initial response
Now we can import those serializers into the views.py that we started to set up before the serializers.
from django.shortcuts import render
from rest_framework_simplejwt.serializers import TokenObtainPairSerializer
from rest_framework_simplejwt.views import TokenObtainPairView
from .serializers import UserSerializer, UserSerializerWithToken

class MyTokenObtainPairSerializer(TokenObtainPairSerializer):
    # @classmethod
    # def get_token(cls, user):
    #     token = super().get_token(user)

    #     # Add custom claims
    #     token['username'] = user.username
    #     token['message'] = 'why is the sky blue?  why is water wet?'

    #     return token

    # commented out function above puts the username and a message encrypted into the access token
    # below function serializes data and makes it accessible in the API, making it easier to grab from the frontend

    def validate(self, attrs):
        data = super().validate(attrs)
        # data['username'] = self.user.username
        # data['email'] = self.user.email

        # changing to for loop to output the data from the serializer instead of adding manually
        serializer = UserSerializerWithToken(self.user).data
        for key, value in serializer.items():
            data[key] = value

        return data

class MyTokenObtainPairView(TokenObtainPairView):
    serializer_class = MyTokenObtainPairSerializer
Now is probably a good time to set up CORS Headers. CORS is an acronym (a lot of acronyms in tech) for Cross Origin Resource Sharing. This is important when developing an API because you have to control who/what has access to not just the data but the API itself. To control API access, we are going to use the convenient Django-CORS-Headers App.
$ # install library
$ pip install django-cors-headers
This is also a good time to create or update requirements.txt:
$ pip freeze > requirements.txt
Get back to that familiar settings.py and continue to install/configure the CORS Headers:
INSTALLED_APPS = [
    'django.contrib.admin',
    'django.contrib.auth',
    'django.contrib.contenttypes',
    'django.contrib.sessions',
    'django.contrib.messages',
    'django.contrib.staticfiles',
    "rest_framework",
    "corsheaders",
    "api.apps.ApiConfig",
]

# https://pypi.org/project/django-cors-headers/
# so django allows a frontend to connect

MIDDLEWARE = [
    'corsheaders.middleware.CorsMiddleware',
...

]

CORS_ALLOWED_ORIGINS = [
    'http://localhost:3000',
]
# this can be set to anything, including 'all'
# I usually put port 3000 because that is the default for React development servers
Back in the terminal, fire up the Django server again:
$ python manage.py runserver
At this point most of the set up is complete and we can start testing the API and building the rest of the functionality. With the Django server up and running and if you used my URL routes, you should be able to go to http://localhost:8000/api/users/login/ and view the My Token Obtain Pair View.
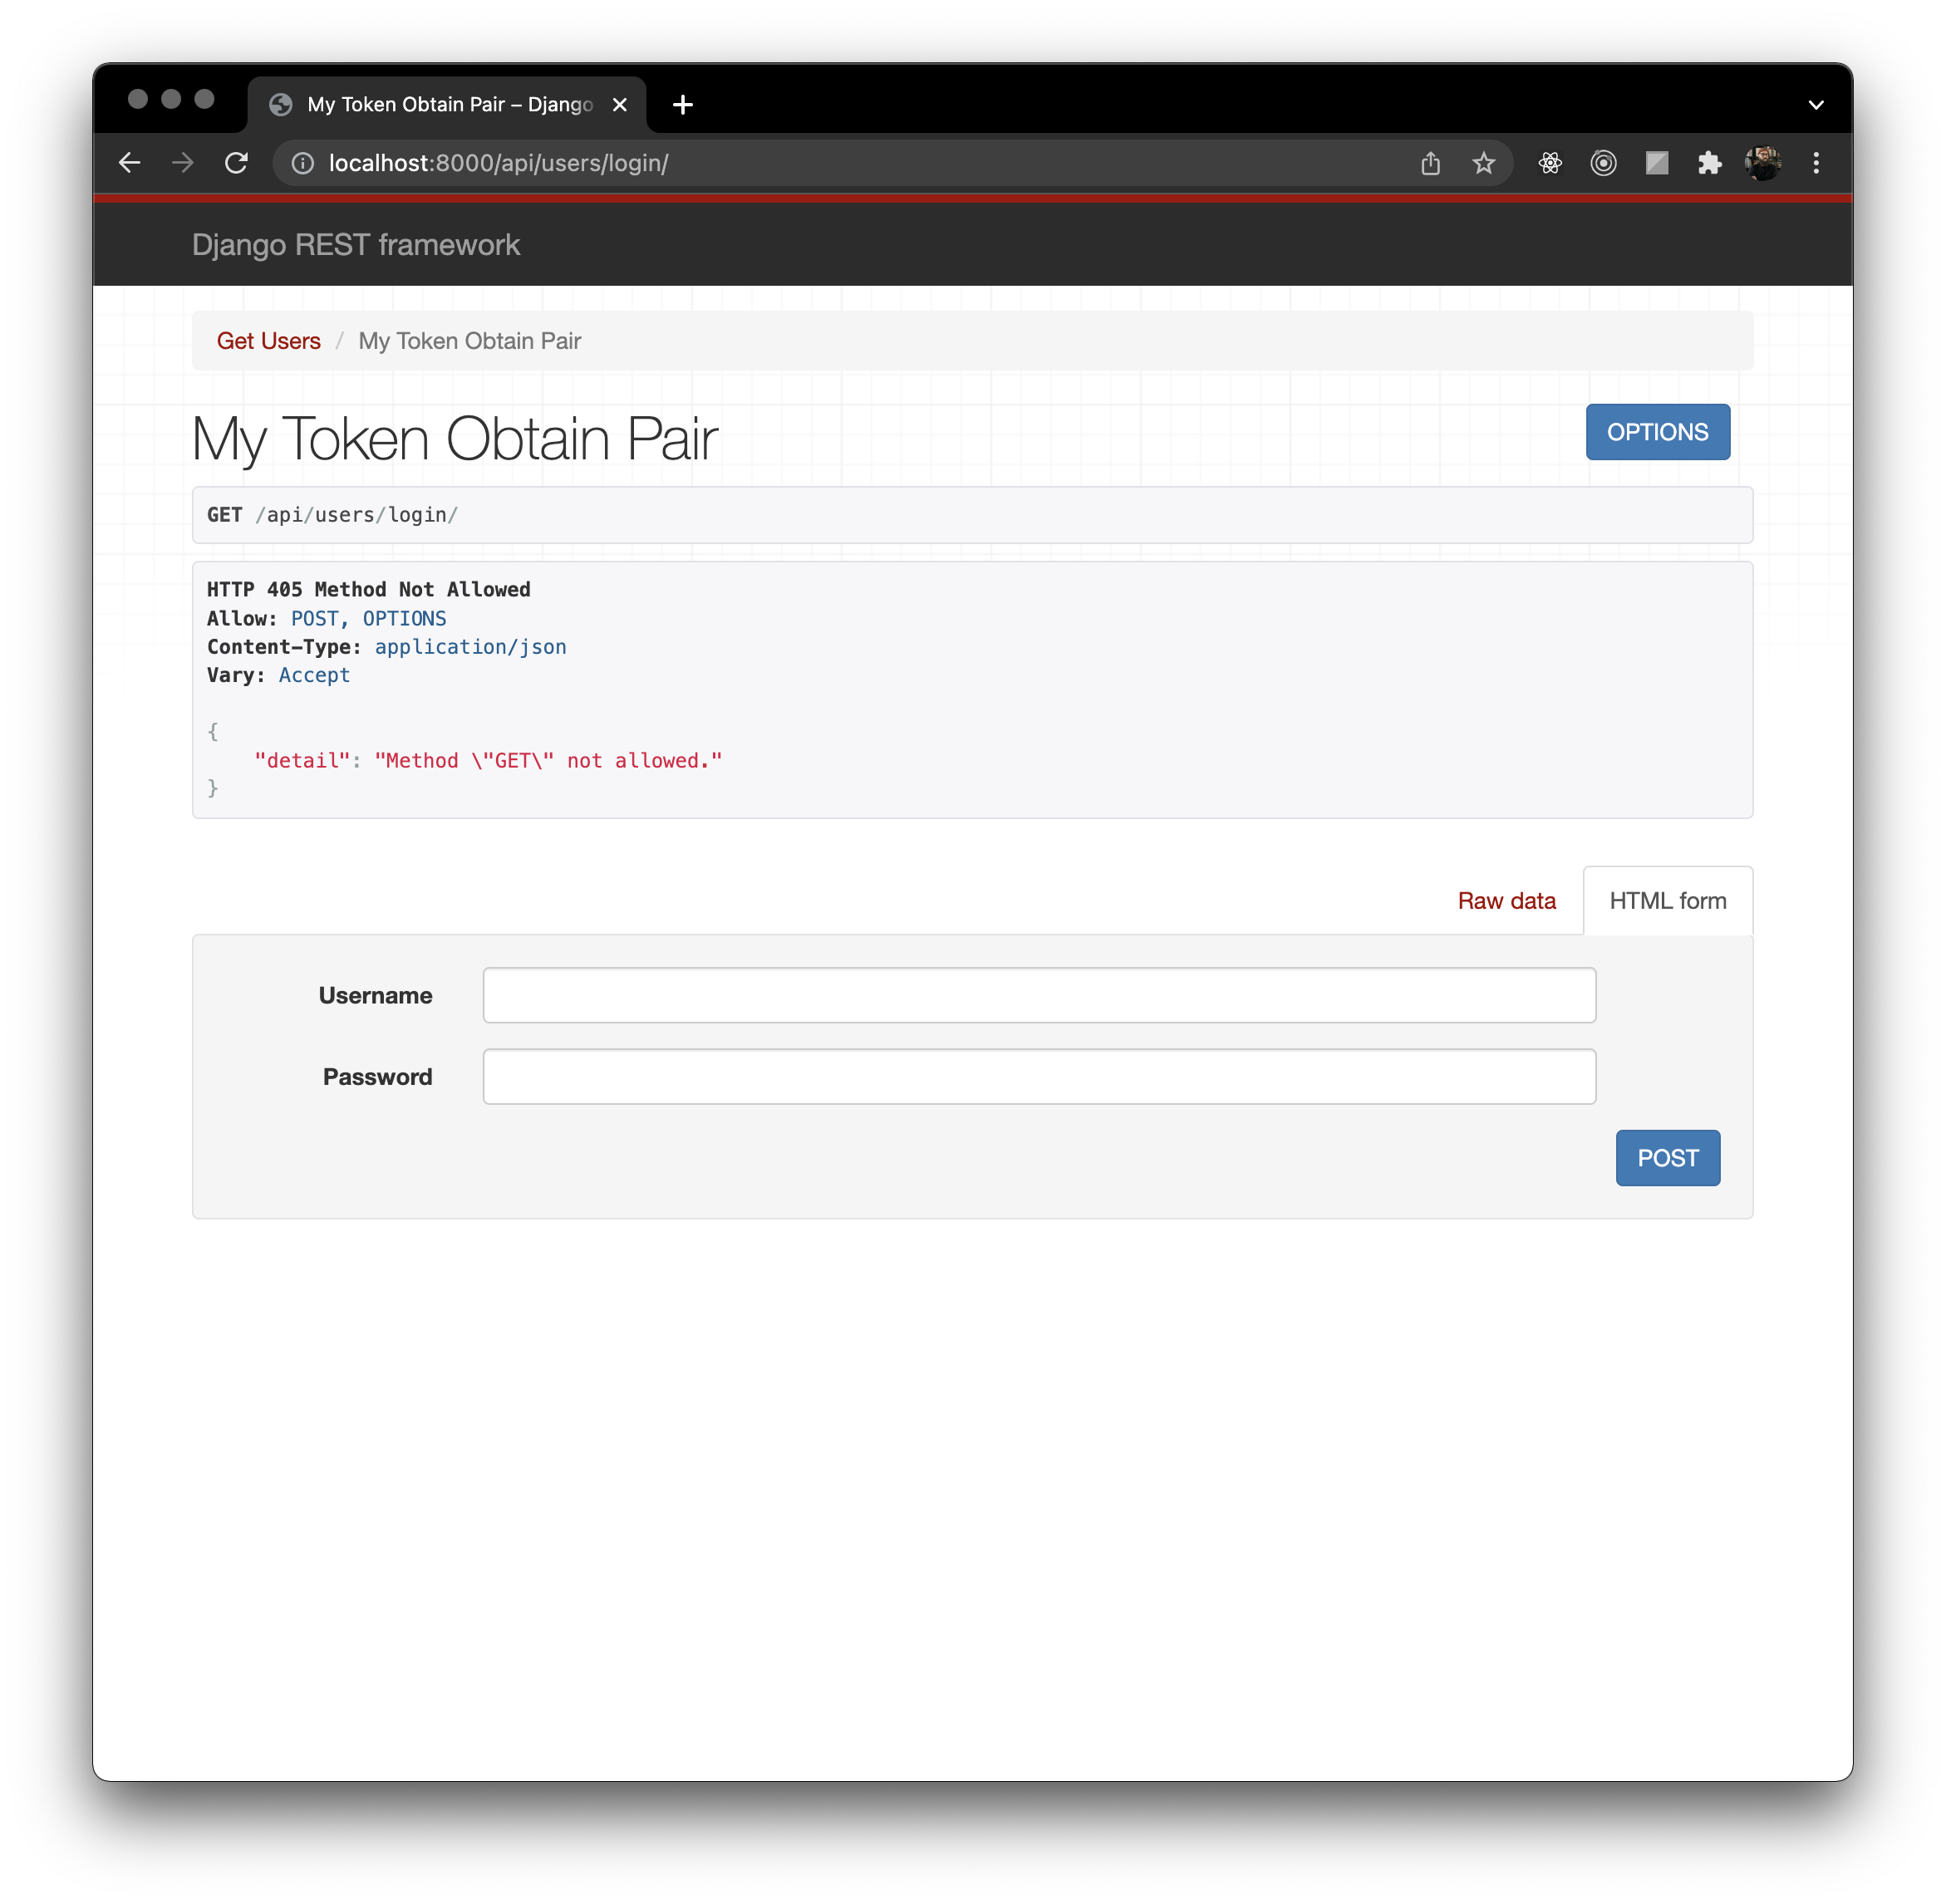
With this view you can login an existing user. If you are following along here, you have one user, the superuser admin one. You can put your credentials into the HTML form or send raw JSON data right from the browser. Alternatively you can use something like Postman to send that data to simulate how a frontend will interact with the API.
The JSON data to send to login a user is simply:
{
    "username": "<your-name>",
    "password": "<your-pass>"
}
Once the username and password are verified the information that we receive back is user account data along with a token that grants access for this user for as long as we customized earlier. That token will also grant access to features that we protect with role permissions.
Now let’s register a new user account for the app. This is cool because users can sign themselves up for your app. In views.py:
from django.shortcuts import render
from django.contrib.auth.models import  User
from rest_framework_simplejwt.serializers import TokenObtainPairSerializer
from rest_framework_simplejwt.views import TokenObtainPairView
from rest_framework.decorators import api_view, permission_classes
from rest_framework.permissions import IsAuthenticated, IsAdminUser
from rest_framework.response import Response
from django.contrib.auth.hashers import make_password
from rest_framework import status
from .serializers import UserSerializer, UserSerializerWithToken

@api_view(['POST'])
def registerUser(request):
    data = request.data
    # print(data)

    try:
        user = User.objects.create(
            first_name=data['name'],
            username=data['email'],
            email=data['email'],
            password=make_password(data['password'])
        )
        serializer = UserSerializerWithToken(user, many=False)
        return Response(serializer.data)
    except:
        message = {'detail':'That email is already registered with us.'}
        return Response(message, status=status.HTTP_400_BAD_REQUEST)
Be sure to add the necessary imports for the decorators. We are also using the Django method make_passowrd() to hash the passwords users create. This protects the passwords from users with admin privileges. To finish this view, wire up the URL path in urls.py :
from django.urls import path
from . import views

urlpatterns = [
    path('users/login/', views.MyTokenObtainPairView.as_view(), name='token_obtain_pair'),
    path('users/register/', views.registerUser, name='register'),
]
Now at http://localhost:8000/api/users/register/ you can register a new user by sending name, email and password in Postman:
{
    "name": "snoopy",
    "email": "snoopy@aol.com",
    "password": "woodstock"
}
Get logged in user data:
@api_view(['GET'])
@permission_classes([IsAuthenticated])
def getUserProfile(request):
    user = request.user
    serializer = UserSerializer(user, many=False)
    return Response(serializer.data)
We are protecting this view with @permission_classes([IsAuthenticated]). That means you need to send that Bearer token from the login to access this data. Wire it up in urls.py:
urlpatterns = [
    path('users/login/', views.MyTokenObtainPairView.as_view(), name='token_obtain_pair'),
    path('users/register/', views.registerUser, name='register'),
    path('users/profile/', views.getUserProfile, name='users-profile'),
]
Get all users:
@api_view(['GET'])
@permission_classes([IsAdminUser])
def getUsers(request):
    users = User.objects.all()
    serializer = UserSerializer(users, many=True)
    return Response(serializer.data)
This one we restrict to not just a logged in user but the user must be admin. The Bearer token again will authenticate that for us. You guessed it… wire it up in urls.py:
urlpatterns = [
    path('users/login/', views.MyTokenObtainPairView.as_view(), name='token_obtain_pair'),
    path('users/register/', views.registerUser, name='register'),
    path('users/profile/', views.getUserProfile, name='users-profile'),
    path('users/', views.getUsers, name='users'),
]
Delete a user: views.py
@api_view(['DELETE'])
@permission_classes([IsAdminUser])
def deleteUser(request, pk):
    userForDeletion = User.objects.get(id=pk)
    userForDeletion.delete()
    return Response('User was deleted')
urls.py:
  ...
    path('users/delete/<str:pk>/', views.deleteUser, name='user-delete')
    ...
    # dynamic value for string value for primary key which is the user ID
Get user by ID and update user: views.py
@api_view(['GET'])
@permission_classes([IsAdminUser])
def getUserById(request, pk):
    user = User.objects.get(id=pk)
    serializer = UserSerializer(user, many=False)
    return Response(serializer.data)

@api_view(['PUT'])
@permission_classes([IsAuthenticated])
def updateUser(request, pk):
    user = User.objects.get(id=pk)

    data = request.data

    user.first_name = data['name']
    user.username = data['email']
    user.email = data['email']
    user.is_staff = data['isAdmin']
    # .is_staff is django admin

    user.save()

    serializer = UserSerializer(user, many=False)

    return Response(serializer.data)
urls.py should now look like this:
from django.urls import path
from . import views

urlpatterns = [
    path('users/login/', views.MyTokenObtainPairView.as_view(), name='token_obtain_pair'),
    path('users/register/', views.registerUser, name='register'),
    path('users/profile/', views.getUserProfile, name='users-profile'),
    path('users/', views.getUsers, name='users'),

    path('users/<str:pk>/', views.getUserById, name='user'),
    path('users/update/<str:pk>/', views.updateUser, name='user-update'),
    path('users/delete/<str:pk>/', views.deleteUser, name='user-delete'),
]
This completes the CRUD functionality with being able to update user data. If you followed my code then the update url would be http://localhost:8000/api/users/update/{id}.
This code is available on my GitHub at github.com/Adamhunter108/django-api-login .
I hope that this helps somebody learn a little about developing APIs or better yet helps somebody out with a project they are working on.

Adam